Are you looking to start a personal blog on WordPress? If yes then you have landed in the right place.
Because in this article, I will share with you a detailed guide to starting a blog using SeekaHost.app, which is very affordable and beginner-friendly.
You might have heard about blogging and its earning potential. Nowadays, many youtube channels feature bloggers who are earning decent money from their full-time blogging careers. Blogging can also be your next passive income source.
In the initial days of my blogging journey, I have done lots of trials and mistakes during starting my first blog. So I have taken lessons from them and sharing with you the perfect and right path to start a WordPress blog.
Quick Navigation
What is Blogging?
Firstly, let’s be clear about the term “Blogging”. Blogging is not just sharing the content on your website in article format but it’s also about video content and pictorial content that you make available online.
It is not just about sharing something online, it can be started as a business. Yes, it’s an online business having the caliber to provide a passive income source.
In today’s era, those who don’t want to go for a 9-5 job and have the potential to share something with others then they can join this online earning opportunity.
I have come across many popular bloggers who started blogging as a hobby and now they are living their dream life through full-time blogging.
Quick Overview: How to start Blogging via SeekaHost.app?
The first step to starting a blog is choosing the domain name and hosting. SeekaHost.app is the best choice for beginners because of its affordable pricing.
You will get the cheapest .com domains in SeekaHost, starting at just $5.99 yearly. SeekaHost PBN hosting plans starts at $1.35/blog/month.
Here is the overview of the steps that I am going to discuss in this article:
- Buy Domain Name
- Purchase Hosting Plan (WordPress Hosting Plan)
- Pointing Nameservers
- Enable SSL
- WordPress theme and plugins setup
- Start with your blogging journey!
Steps to start a personal blog with SeekaHost.app
Follow our detailed step-by-step guide given below to start a WordPress blog using SeekaHost App.
Step 1 – Choosing a Domain Name
It’s a little bit of a tedious task due to domain name unavailability. Most brand names are already taken by someone else or they might be parked.
Everyone wants the .com domain for their brand website names and I also recommend you to buy the .com extension for your domain name.
SeekaHost.app is the cheapest .com domain provider in the market. Other TLDs like .net, .co, and .in are also available in SeekaHost at a very cheap price.
Here are some useful tips to choose the best domain name for your website:
- Prefer to go with 3 to 7 letters short domain names.
- Check availability of .com with your brand name, if not then only go for other TLDs
- Check renewal rates also because sometimes some domain registrar takes very high rates at renewal.
- Prefer to take the domain and hosting both from the same service provider to manage them easily with extra benefits.
That’s why we genuinely suggest using SeekaHost.app for buying the domain name and hosting.
How to buy a domain name from SeekaHost.app?
Click on this link to visit the official site of SeekaHost. Now search your required domain name in the search box.
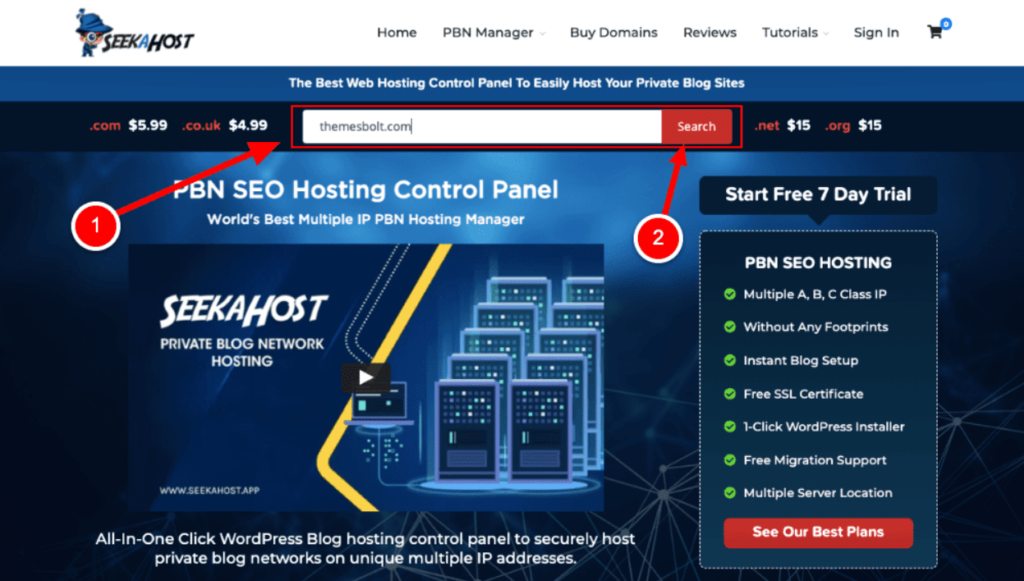
Available domain names with a .com extension will cost $5.99 per year. Indian users will get the same domain pricing as 440 INR only.
Click on “Add To Cart” and proceed to the next page. Now click on the checkout button.

You have to register (sign up) with SeekaHost.app and then again have to log in.
After logging in, you will get final pricing with some privacy protection charges on your SeekaHost.app dashboard. Disable Privacy Protection because it will cost $4 per year.
Fill in the basic information on the next page and click on Next. Choose the payment method and click on Order Now.
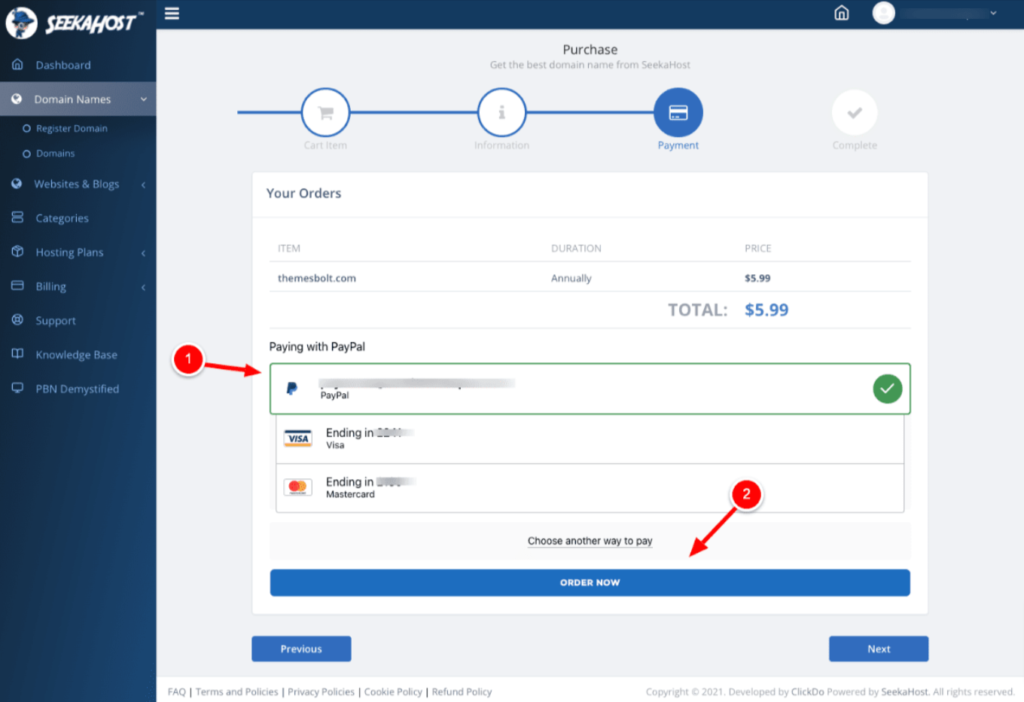
After making payment you can see your purchased domains in your domain names section on SeekaHost.app dashboard.
That’s how you can purchase a domain from SeekaHost.app and almost the same process is applicable with all other Domain Registrar.
Step 2 – Purchase a hosting plan from SeekaHost.app
The same dashboard of your account can be used for purchasing the hosting from SeekaHost.app. Let’s discuss how you can purchase WordPress hosting.
Click on the option of the hosting plan on the left panel of the SeekaHost.app dashboard.
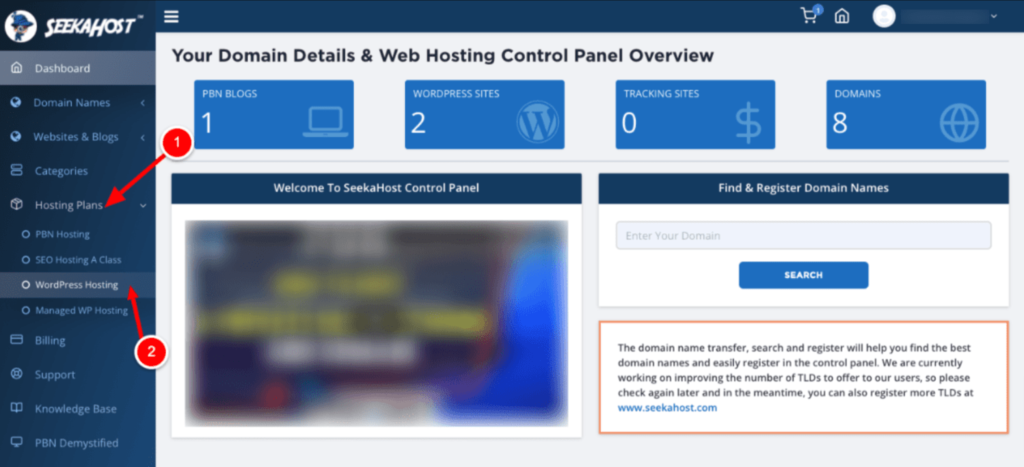
There are 3 different options available on SeekaHost.app like PNB, WordPress, and Managed WordPress Hosting. We are starters in Blogging so we will go with WordPress Hosting.
On the next page, you will get Starter, Standard, Growth, and Premium plans. You can choose your plans accordingly, but we suggest Standard Plan with 15 GB Disc Storage and 50 GB bandwidth for the blogging journey.
The starter plan starts at $1.49 per month while the Standard plan will cost $5.50 per month. You can host 3 websites on the Standard hosting plan.
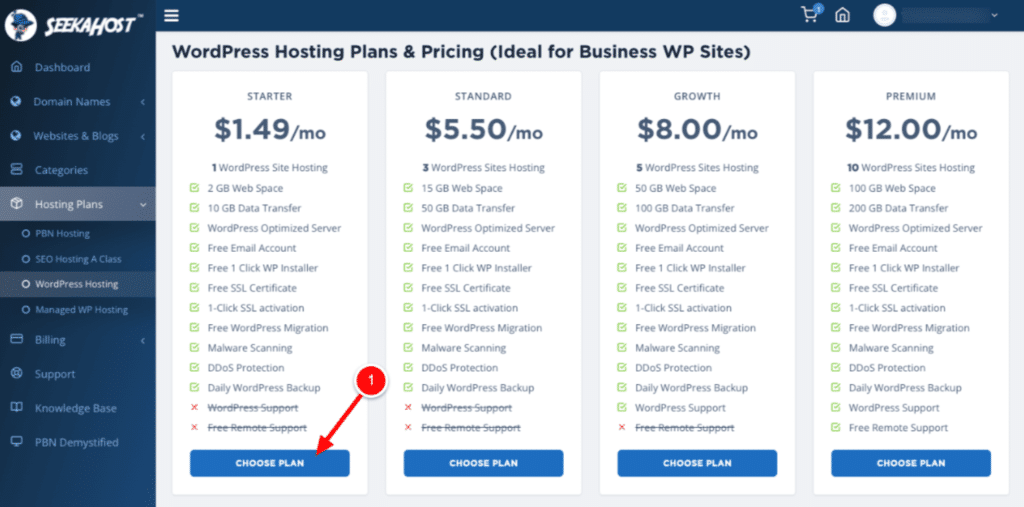
Choose the plan and make payment for that plan. That’s it, you have successfully purchased domain and hosting from SeekaHost.
Step 3 – Create your WordPress blog in the SeekaHost app
SeekaHost.app has a separate section for WordPress websites and blogs. It’s a really amazing feature for all those non-technical persons.
Navigate to the WordPress sites tab present under the Websites and Blogs option on the left panel of the dashboard.
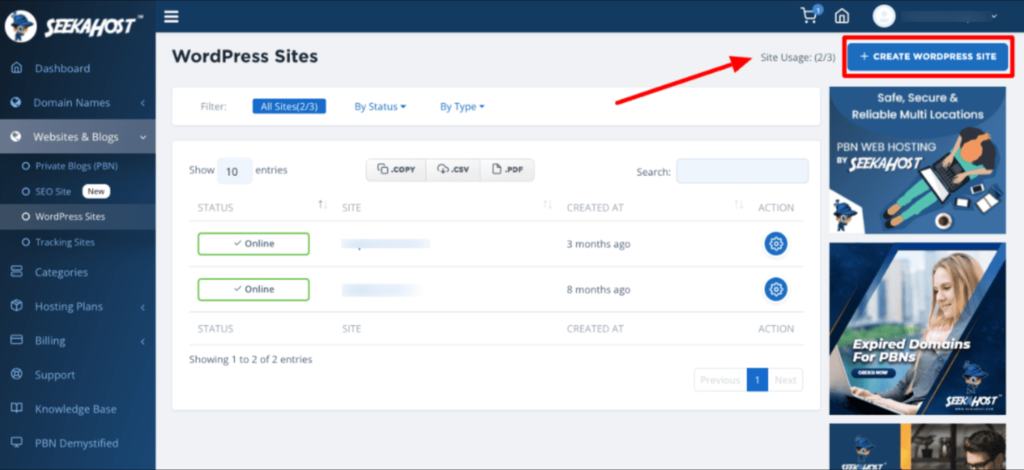
Click on the Create WordPress Site button available in the right side corner.
Add WordPress site domain, WordPress Site Title, Enable the Visibility and after choosing the hosting plan Click on the Add WordPress Site.
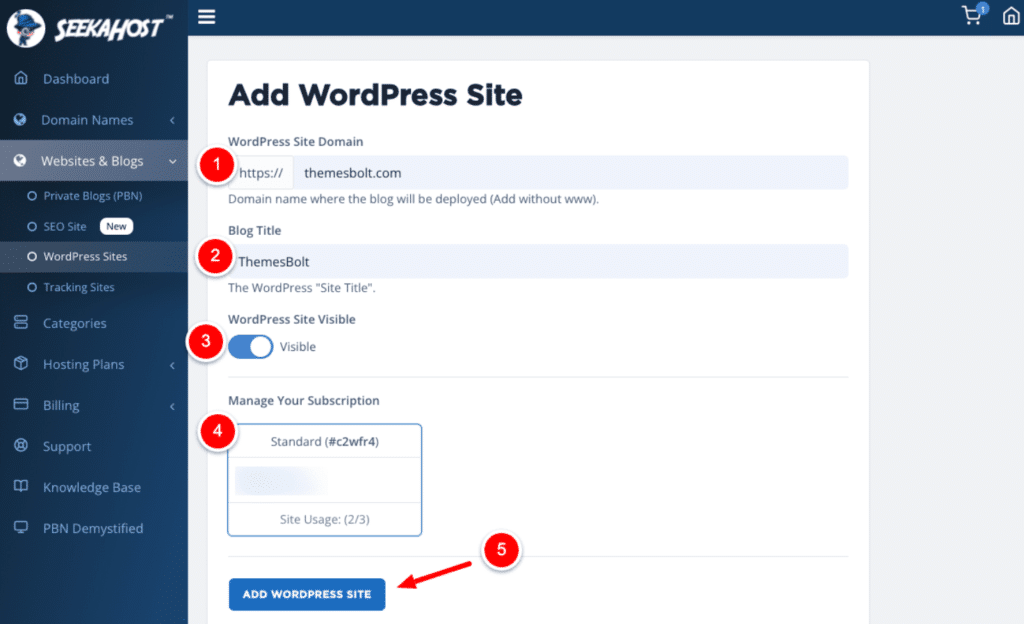
WordPress installation will begin after these steps. WordPress will be installed within a maximum of 2 minutes.
Step 4 – Pointing the domain nameservers to SeekaHost.app
Pointing the Nameservers of domains to the hosting of the WordPress website is important to make the site visible on that domain. Follow some simple technical steps to point nameservers.
Visit the Websites and Blogs followed by WordPress sites on the left sidebar of the SeekaHost dashboard.
Click on the setting icon at the right end of your website title.
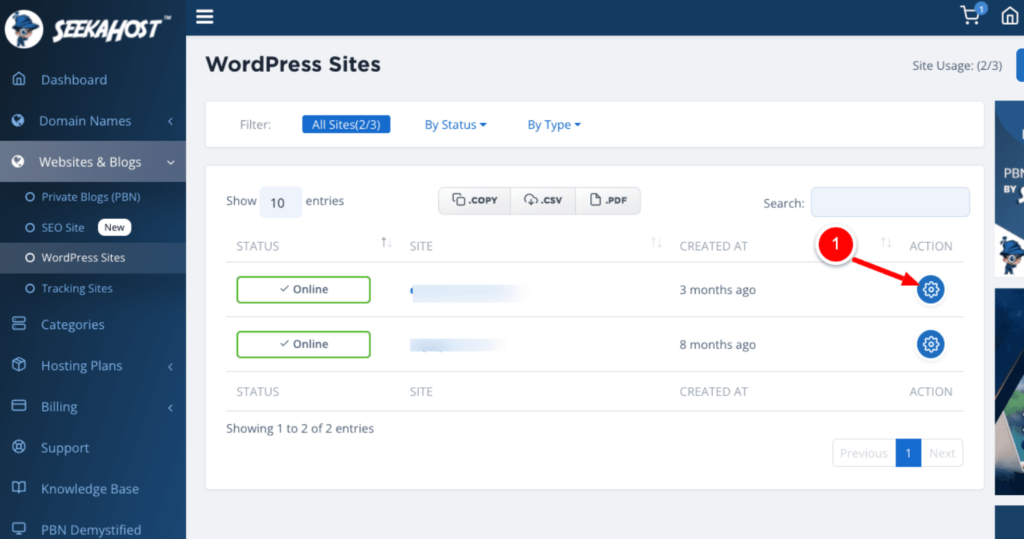
There will be 2 nameservers present on the next page. Copy both name servers somewhere else.
Two nameservers of the SeekaHost app are:
- ns1.seekaappcontrol.com
- ns2.seekaappcontrol.com
Now visit the domains tab under the Domain Names tab in the left panel.
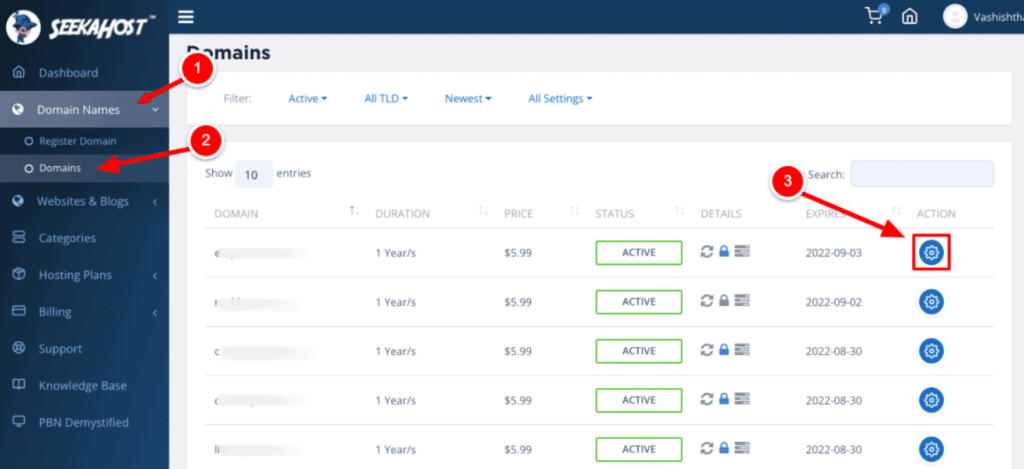
Click on the setting icon in front of your domain name.
There will be a Nameservers tab, click on it and click “unlock your domain” to point the domain to manual nameservers.
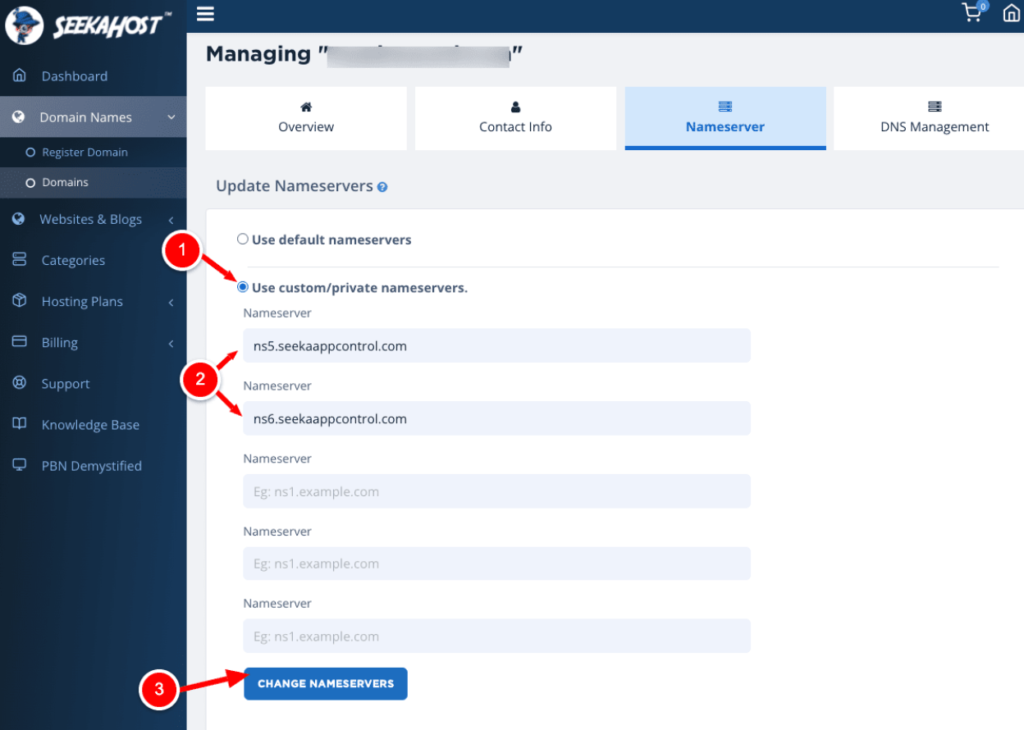
Tick the use custom private nameservers option. Add 2 nameservers that you have copied.
Proceed with clicking on Change Nameservers.
Step 5 – Enable SSL certificate for your blog
SSL is the factor showing trust and affects SEO more nowadays. This is only because SSL provides trust to every user about website security.
SSL can be enabled only if you point nameservers correctly.
Under the Websites and Blogs tab followed by WordPress sites followed by setting the icon of your website, you will find the SSL option in the right panel.
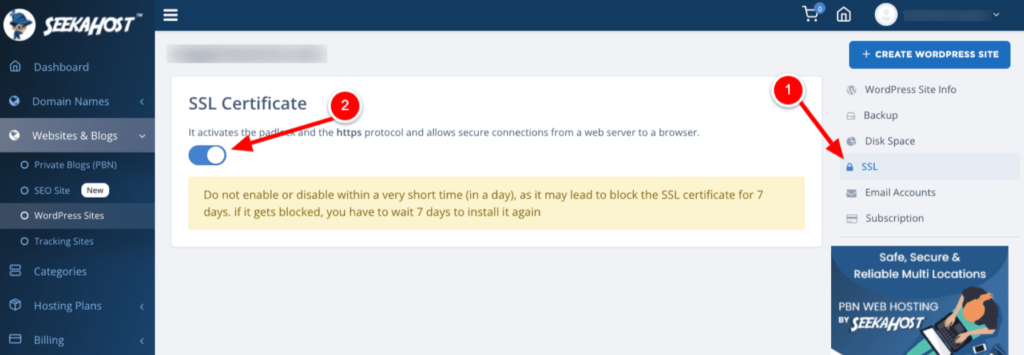
Enable SSL Certificate by enabling the toggle present there.
SSL certificate will be installed on your website and Google will trust you because of your SSL certificate.
Step 6 – Install themes and plugins on your blog
Your email address shared at the time of registration will receive one email regarding your login credentials and login link. Click on that link to proceed to your WordPress dashboard by providing login credentials.
Under the Appearance tab on the left side panel, you will get the theme tab. Click on Add New Theme button available on the top header.
I recommend using any lightweight theme like GeneratePress and Astra, these will help you to load your website faster.
Now install all the necessary plugins for your WordPress blog. Some recommended plugins are RankMath SEO, Updraftplus, Wordfence security, Litespeed cache, etc.
Step 7 – Publish your first blog post
Adding a first blog post can be done through the following steps:
Hurrah! Your blogging journey started with SeekaHost.app in simple steps.
Conclusion
I hope this detailed step by step guide helped you start a personal blog on WordPress using SeekaHost app.
The affordable pricing of SeekaHost domain names and hosting place makes it a convenient choice for beginners.
Blogging journey with SeekaHost.app can be easier than any other platform because not much technical knowledge is required here. It’s simple and faster than any other WordPress hosting service provider.
